Further exploring how a service works
Previously, we’ve learned some basics about how a Convoworks service is laid out and what constitutes one. In this chapter, we’ll take a closer look at these components, as well as demonstrating a simple real-life block.
To recap, in a conversation block you define which user utterances you will react to, as well as what will happen if nothing can be matched, i.e. the fallback flow.
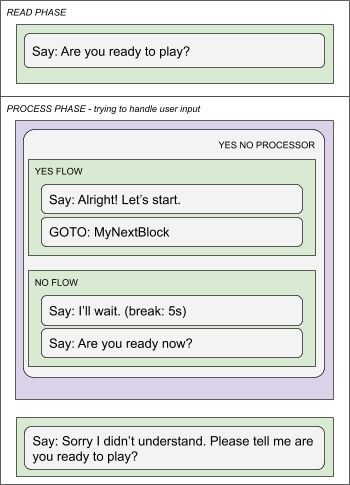
Here is a simple example which prompts the user for confirmation to move further in the service flow.
Elements
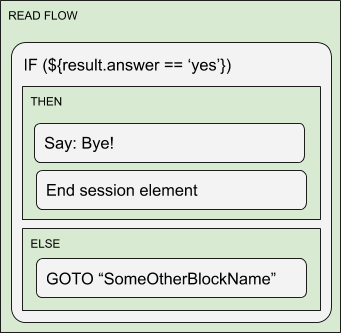
Elements are executed in sequential order. Some elements can have one or multiple sub-flows. E.g. If, else if, else if …
Elements are able to set and use variables so that way you can communicate between various service parts.
Here is a simple example of nesting elements while using control structures.
Processors
As we’ve mentioned before, a typical processor has two main parts: the first containing elements, which will be executed if a certain condition is met, and second, containing request filters whose purpose is to determine whether or not the processor will be activated, and to transfer platform data into the service evaluation context (slot values, intent name, etc.).
To be a more reusable concept, we designed processors to actually delegate matching responsibility to a third type of component, the Request Filters.
Request filters are the bridge to the underlying NLP platforms type we rely on. It can consume intent based platforms like Alexa, Dialogflow or Wit.ai, but it can also use raw text based platforms like Google Actions, web chat, FB Messenger. You can handle text based requests with Google NLP or plain text request filters.
Note that you can delegate raw text platforms to Dialogflow and at the end use it with intent request filter. This means that you can use the same logic for handling Alexa (which is a strictly intent based system) with FB Messenger and Viber which are providing just raw text inputs.
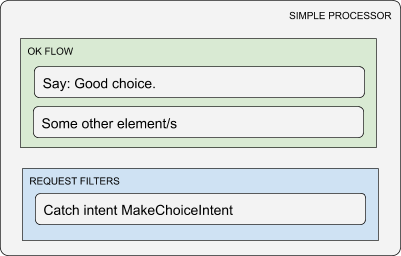
This is an example of a built-in Simple Processor which has one OK flow and has place for request filters.
More specialized processors might have multiple OK flows. They also might omit request filter definitions completely and use pre-defined built in logic in which case the operator has less to configure.
Typically, you will stack several processors one behind the other in a single block. The block will use the first processor which accepts the current request. If none of the block’s processors are matched, the system will check the special block called Service Processors which you can add in your workflow.
This way you are able to define service level functionalities like implementing help, navigation home, or stopping the service.
Request filters
When the user makes a request, either through text or through speech, depending on the platform, we will get either raw text or evaluated user intent as information to work with.
A request filter will first check if it is actually compatible with the given request. If it is, it will evaluate request data into service context and any remaining request filters will not be taken into consideration at all. If it is not compatible with the request, it will reject it and the next request filter will be asked the same thing and so on.
Request filters normally accept sub-components, like platform intent readers, NLP readers, and so on. This is so that you can react to several different intents in the same manner.
In most cases you will use Intent request filter which matches and reads requests from intent based platforms (Alexa, Dialogflow). The recommended way is to use Convoworks’ Intent model which will be automatically propagated to required platforms. In such a case, you will use Convo intent readers to match the desired intent.
If the intent contains slot values, they will automatically be transferred to the service evaluation context under the name result (e.g. ${result.answer}). You also have the ability to configure intent readers to rename some slot values (you can’t have the same slot name on two intents on Amazon!) or to set some predefined value.
The first case, renaming, is very useful because of Alexa’s inability to use the same slot name over multiple intents. In such a case you might end up with several intents carrying exactly the same information but under the different slot names. In our case, you will rename slots to one particular name on the filter reader level and handle it uniquely without additional “ifs” or transformations you would usually have to perform.
The second case, predefined values, is helpful to patch Alexa’s or Dialogflow’s misinterpretations. It is unfortunately common to get misheard or misinterpreted results, no matter how well your intent model is set up. For example, you will get the word “three” instead of the number “3”, or the word “bee” instead of the letter “b”. In such a case, you will create new intent with bad example phrases, catch them with an intent reader and set the actual, desired value under your slot name.
Reusing logic with fragments
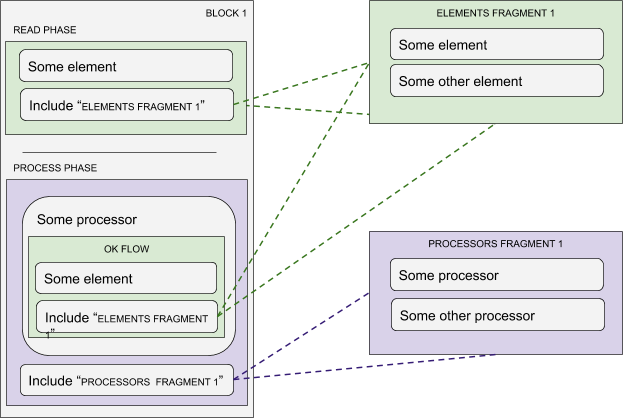
You can group components into fragments and use them in multiple places in the workflow. So far we support elements and processors fragments.
When you want to include a fragment, you will place the “Include Fragment Element” or “Include Fragment Processor” component in the desired place.
During runtime, the system executes fragment components as if they were actual parts of the block, i.e. they have access to all block variables just like any other component in it.
Real life example block
Here is a block from the Robo Numbers game. It is a classic number guessing game. This particular block is used in setting up clash mode and it tries to set the competing device name. Clash mode is when you have two devices playing one against other.
Try looking over the image and see if you can deduce what’s going on.
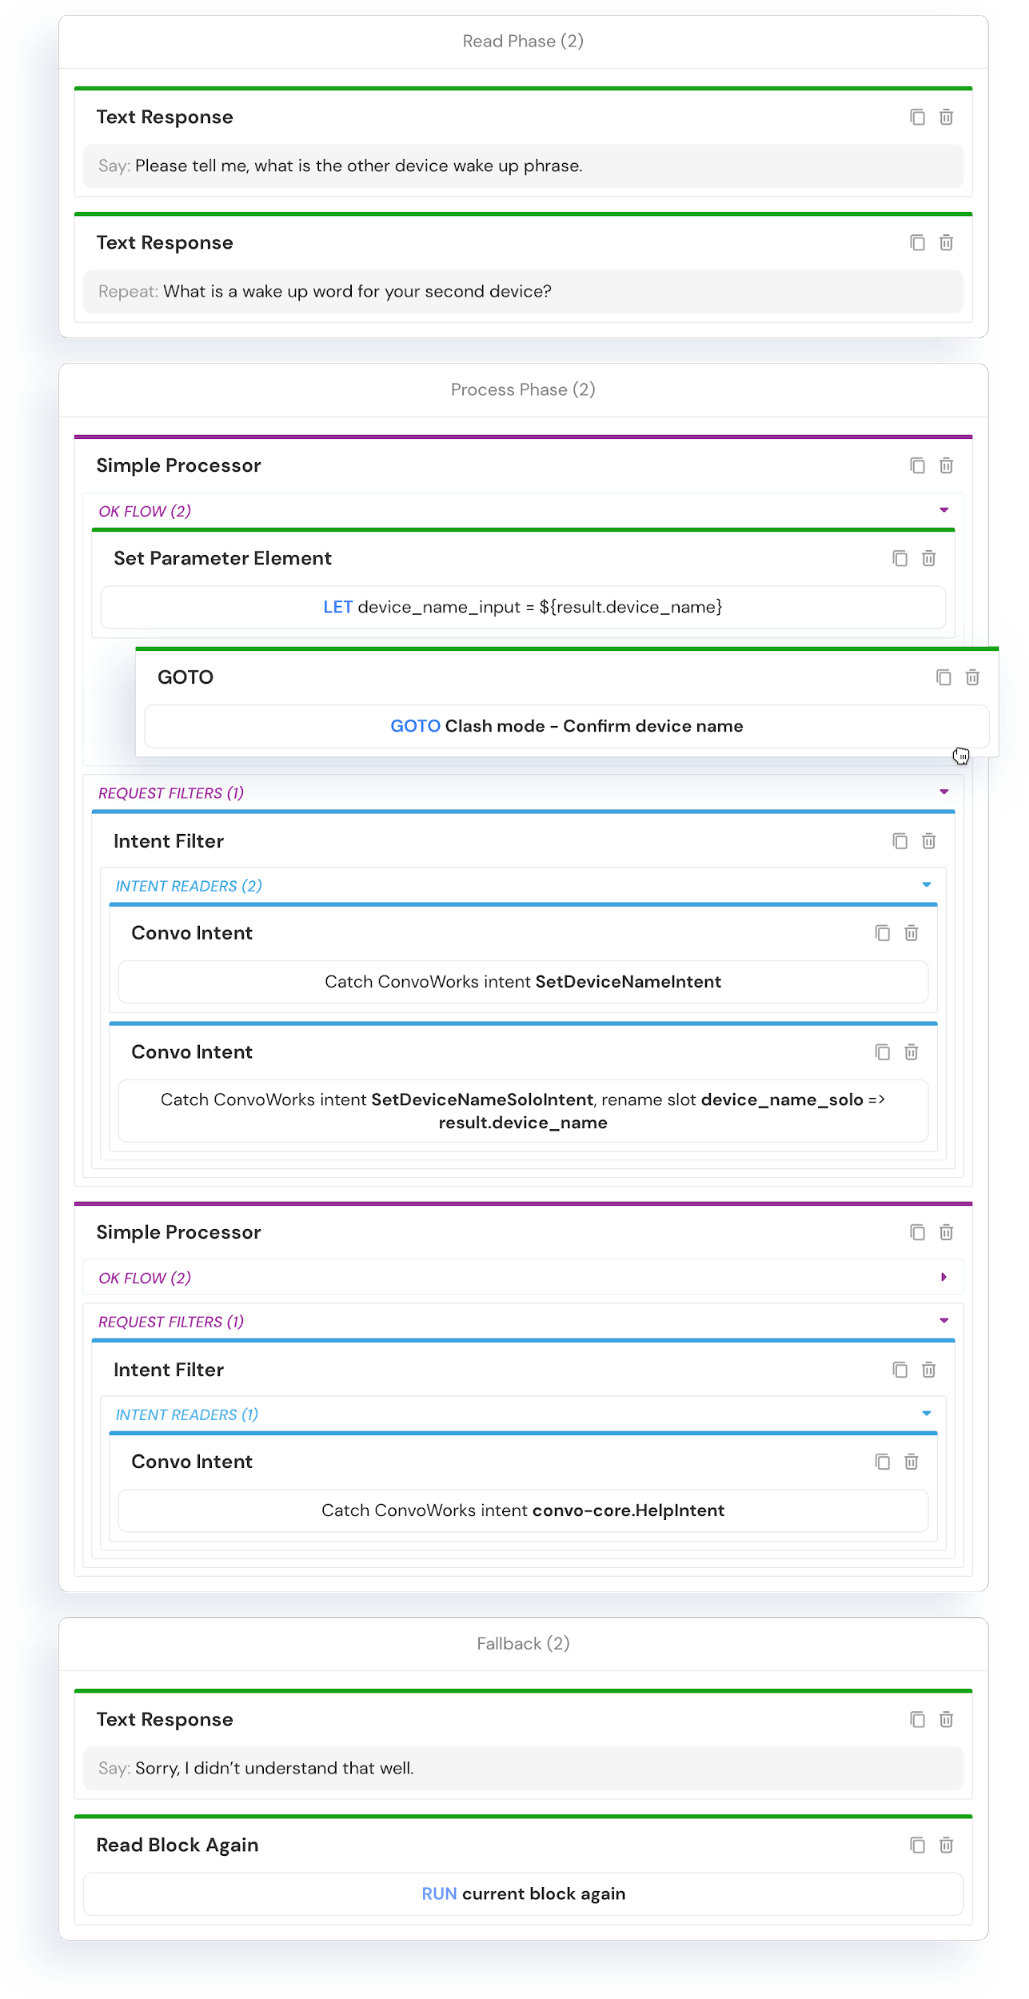
At the very beginning, it asks the user for the device name. Here you can notice that we also defined reprompt text for any system that might support it. Once we ask the question, the system waits for the user’s response.
We have two processors which will try to handle the user response. The first will activate if the user gives us the device name. You can notice here that we set up two filters to catch two different intents.
In our case, we defined SetDeviceNameIntent which uses AMAZON.SearchQuery entity.
The second intent, SetDeviceNameSoloIntent, catches AMAZON.FirstName entity. In this case we do not need additional text, but we have to use a different slot name, so the utterance definition is: “{device_name_solo}”. Note how we configured intent readers such that we end up with the same slot name for both intents, making our control logic more clear.
The second processor catches any Help intents. This help section is for this block only, and as such, it explains this particular step in conversation – setting the competing device name. We are using a system defined intent. System defined intents will be automatically propagated to platforms so you do not need to do anything.
In the fallback flow, we notify the user that we didn’t understand what the request was and then we re-run the block’s initial read flow – informing the user what is expected from them (again).