Defining package intents
Package specific intents are defined in a .json file. Create a .json file with any filename in the folder where your package definition is located. This .json file has the following structure:
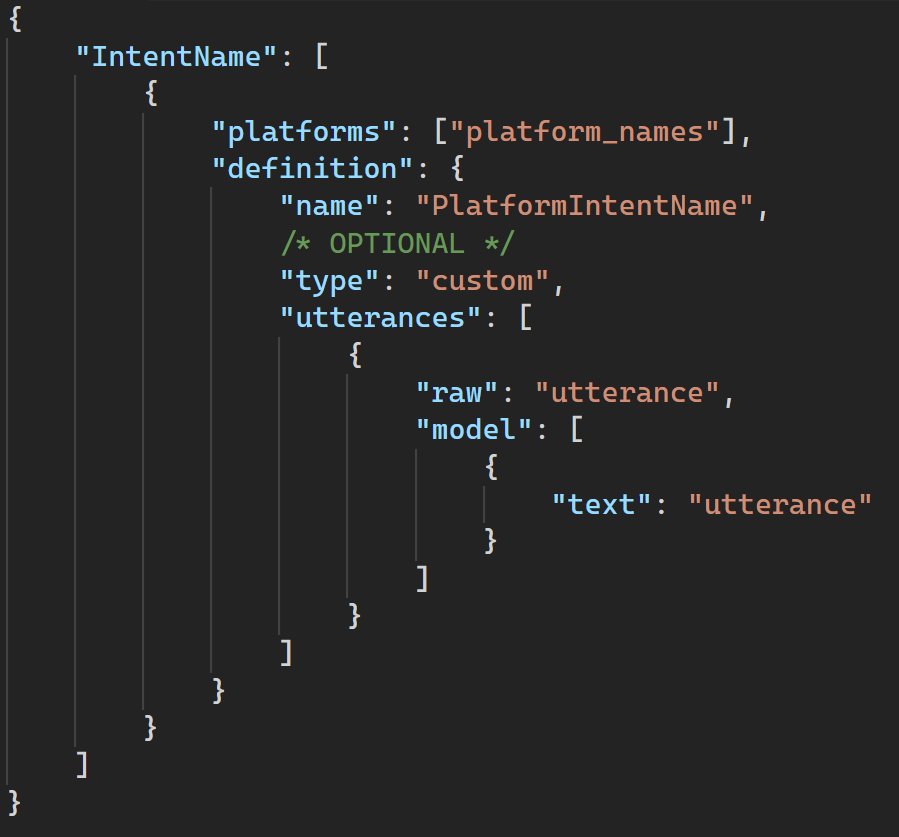
Each intent has an array of definition objects. Per definition object you may define which platforms this model applies to (used during propagation to specific platforms), with currently supported platforms being “dialogflow” and “amazon”. The definition itself consists of the intent’s platform name, and, if you wish to create your own custom intents, it must have a “type” property with the value “custom”.
“utterances” is an array of utterance objects. Each object has a “raw” utterance in its entirety, and then an array of parts called “model”.
As an example, let’s use a sentence with a slot value, e.g. “Today I want to eat {food}”. A specific example could be “Today I want to eat shrimp”. We split the sentence into two parts: “Today I want to eat”, which is just bog-standard text with no additional meaning, and “shrimp”, which is a possible slot value. Here is an example intent defined for Dialogflow:

Note how the part of the sentence that is a slot value has additional properties. In addition to the “text” part, you also define the slot’s “type”, which should be an entity that is available in your system. Lastly, “slot_value” determines the name under which the parsed slot value will be available for you to use in the editor. In this case, you would access the parsed value with ${result.foodName}.
Once you have defined all the intents you need, you must register them in your package. To do this, implement \Convo\Core\Intent\ISystemIntentRepository in your package definition class. Initialize your intents by overriding the _initIntents() method. You can return the result of _loadIntents() method from the parent abstract class and give it the namespace path to your .json intent definition file. For example, if your package is \Convo\Pckg\Acme\AcmePackageDefinition, and you followed the guidelines by placing the intent definition file in the same directory (suppose it is called just intents.json), give the _loadIntents() method the path ‘Convo/Pckg/Acme/intents.json’. This will parse and load the intents you have defined, making them available for usage.
Define package entities
If you wish to provide entities in your package, first implement \Convo\Core\Intent\ISystemEntityRepository in your package. This interface defines two methods, findPlatformEntity($name, $platformId) and getEntity($name). These are implemented in the AsbtractRepositoryPackageDefinition class, but you may optionally override them.
In your package class, override the _initEntities() method. In the body of the method, you will create an associative array of strings mapped to \Convo\Core\Intent\SystemEntity. Give the system entity a name that you will use in your services.
Next, for each platform you mean to make the entity available on, e.g. Amazon and Dialogflow, call the method setPlatformModel($platformId, $entityModel). Here is where things diverge.
If the entity you wish to create is already built-in on the platform of your choice, for example Amazon’s number entity (AMAZON.NUMBER), then for the entity model argument simply instantiate a new EntityModel, and for the desired platform ID, give it the name of the entity on that platform, and set the second parameter to true, indicating that it is a system entity. Going off the AMAZON.NUMBER example, here is what the number entity defined in the core package looks like:
$entities[‘number’]->setPlatformModel(‘amazon’, new EntityModel( ‘AMAZON.NUMBER’, true));
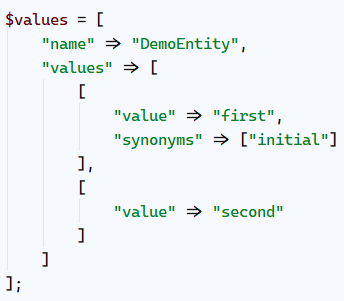
If you want to create a custom entity, things are slightly different. Each custom entity needs a name, and a list of values. Here is an example of a value list for a demo entity. Note that synonyms for each entry are optional.
Now that you have your values, create a freestanding EntityModel. After you do so, call the load() method and pass it the associative array of values.
After that, simply create a system entity and add it to the original associative array of string => entity, and set the platform model how you normally would. Here is how it all looks tied together.